GraphQL-tutorial
Contents
- GraphQL 이란?
- 왜 GraphQL 인가?
- GraphQL의 장점과 단점
- GraphQL과 오픈소스: Open API 및 Swagger
- GraphQL 준비
- GraphQL 문법
- GraphQL 시작(start)
- GraphQL 끝(final)
- Further Study
- References
GraphQL 이란?
- API를 위한 쿼리 언어
- 기 존재하는 데이터 쿼리를 수행하기 위한 런타임
- API 진화의 강력한 개발자 도구: playground
왜 GraphQL 인가?
- Over fetching
- 기존, 예를들어 사용자 정보에 불필요한 부분이 REST API에 포함되있다면, Front 전체를 다 받아서 parsing 해야함
- GraphQL을 사용하면 Front가 원하는 정보만 요청할 수 있음
Over fetching해결!
- Under fetching
- 기존, 예를들어 영화 앱을 개발하는 경우 비디오 정보와 제작자 정보를 받아와야했음
- 하나의 주제를 표출하기 위해 여러 개의 REST API를 호출하는 해야하는 것을
Under fetching이라함 - GraphQL을 사용하면 Front가 한번의 요청으로 원하는 데이터를 얻을 수 있음
Under fetching해결!
- Backend 개발
- Schema와 Resolver를 한 번만 구현 해놓으면 추가 patch 비용이 거의 들지 않음
- API 문서화는 주석으로 대신할 수 있음 (이력관리는 swagger나 마찬가지임)
- 기본 Framework: Apollo GraphQL
- 유용한 툴: Sequelize Auto, GraphQL Tools
- 간편해진 Loading, Error, Success 처리
- Backend에서는 return type이 이미 지정되있으므로 error는 throw로 처리
- Front에서는 동일한 Error에 대해서 예외처리만 하면 됨
- Playground GUI 테스트 환경
- 기존, API 문서와 Postman 을 대치 가능
- Playground 에서 쿼리 Loading, Error, Success를 바로 확인 가능
- 검색 기능이 내장된 Document 기본 제공
- Schema 다운로드 기능 기본 제공
GraphQL 장점과 단점
- GraphQL 장점
- GraphQL 스키마는 GraphQL 애플리케이션(Front)에 신뢰할 수 있는 단일 소스를 하나 제공 => Query.graphql or Query.json
- GraphQL 호출은 단일 왕복으로 처리되며 클라이언트는 오버페칭 없이 요청한 결과만 얻음
- 엄격하게 정의된 데이터 유형은 클라이언트와 서버 간 통신 오류를 줄여줌
- GraphQL 클라이언트(Front)는 사용 가능한 데이터 유형 목록을 요청할 수 있음
- 자동 생성 문서는 playground를 통해 제공
- GraphQL은 애플리케이션 API가 기존 쿼리를 중단하지 않고도 진화할 수 있도록 허용
- REST API로 사용할 수 없는 기능을 제공하기 위해 대부분의 오픈소스 GraphQL 확장 기능을 사용할 수 있음
- GraphQL은 특정 애플리케이션 아키텍처를 지정하지 않으므로 기존 REST API에 추가하여 기존 API 관리 툴과 연동할 수 있음
- GraphQL 단점
- REST API에 친숙한 개발자의 경우 GraphQL를 학습하는 데 시간이 필요
- GraphQL은 데이터 쿼리의 상당 작업을 서버측으로 옮겨 서버 개발자 작업의 복잡성이 커짐
- 구현 방식에 따라 GraphQL은 REST API가 아닌 다른 API 관리 전략을 필요로 할 수 있음 (특히 비용 제한과 가격을 고려하는 경우)
- 캐싱이 REST보다 훨씬 복잡함
- API 유지관리자의 경우 유지 관리 가능한 GraphQL 스키마를 작성하기 위한 추가 태스크를 수행해야 함
GraphQL과 오픈소스: Open API 및 Swagger
  GraphQL은 Facebook에서 개발했으며 2012년에는 모바일 애플리케이션을 위해 사용됨
  GraphQL 사양은 2015년에 오픈소스로 공개됨
현재는 GraphQL Foundation이 감독하고 있음- Apollo: 프론트엔드 클라이언트 라이브러리(Apollo Client)와 백엔드 서버 프레임워크(Apollo Server)를 포함하는 GraphQL 플랫폼
- Offix: 애플리케이션에 도달할 수 없는 경우에도 GraphQL 변형 및 쿼리를 실행할 수 있도록 허용하는 오프라인 클라이언트
- Graphback: GraphQL 지원 Node.js 서버를 생성하기 위한 커맨드라인 클라이언트
- OpenAPI-GraphQL: OpenAPI 사양 또는 Swagger로 설명된 API를 GraphQL로 번역하기 위한 커맨드라인 인터페이스 및 라이브러리
GraphQL 준비
- GraphQL tutorial 튜토리얼 준비물 다운로드
- 서버개발자: REAME.md의 내용을 읽고 starter > final 순으로 진행
- 앱개발자: Final > README.md 내용을 읽고 final 설치 후 각각 iOS, Android로 진행
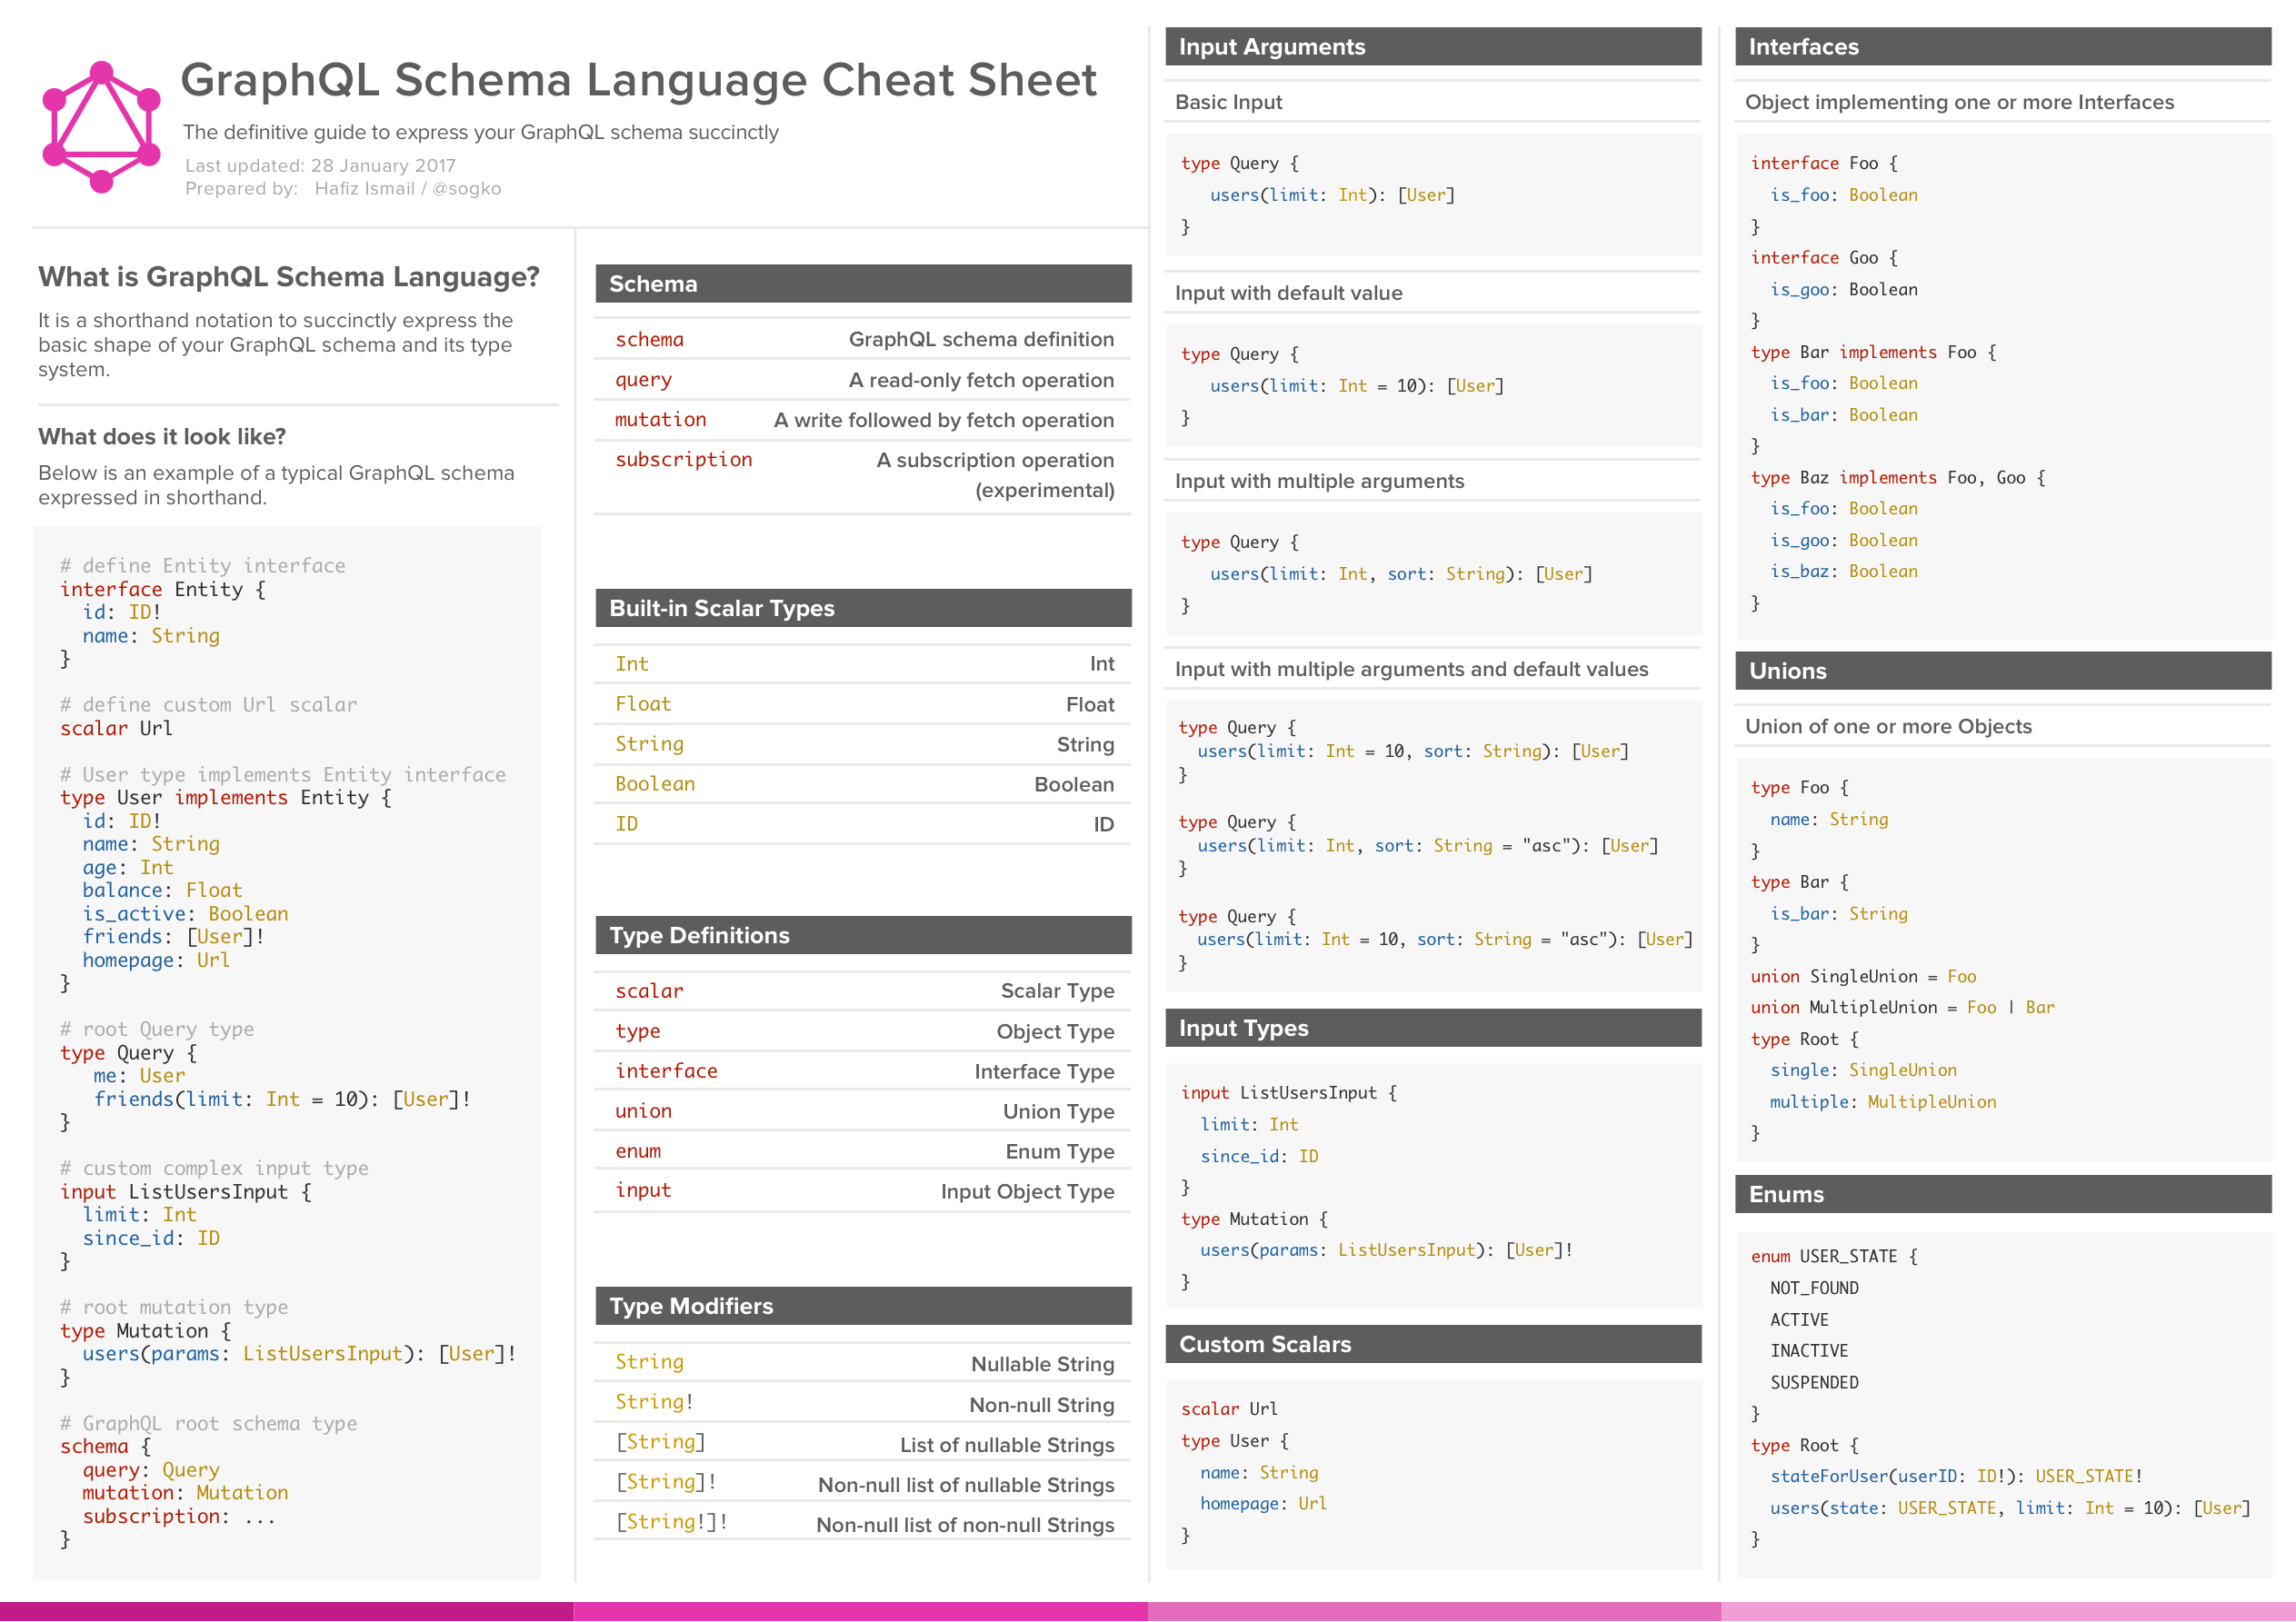
GraphQL 문법
- GraphQL Schema Language Cheat Sheet

GraphQL 시작 (github)
서버 설치
- MySQL 서버 설치
mysql홈브루( HomeBrew )를 통한MySQL설치$ brew install mysqlMySQL데몬 서비스 등록하기 (선택)$ brew services start mysqlMySQL데이터베이스root사용자 암호 설정하기$ mysql -uroot mysql> USE mysql mysql> ALTER USER 'root'@'localhost' IDENTIFIED BY 'qwer1234'; mysql> FLUSH PRIVILEGES; mysql> quitsample_db_graphql데이터 베이스 생성하기$ mysql -uroot -p mysql> CREATE DATABASE sample_db_graphql; mysql> quit
seeders/dump-sample_db_graphql.sql파일로부터 DB 복원하기$ mysql -uroot -p sample_db_graphql < ./seeders/dump-sample_db_graphql.sql- npm 의존성 패키지 설치하기
$ npm install3.1 If
sh: nodemon: command not founderror occurred$ npm i -g nodemon
서버 설치
- npm 으로 서버 시작하기
$ npm start- 다음과 같은 메세지와
localhost의 4000번 포트에 서버가 시작된다.
 [nodemon] 2.0.7
 [nodemon] to restart at any time, enter `rs`
 [nodemon] watching path(s): *.*
 [nodemon] watching extensions: js,mjs,json
 [nodemon] starting `babel-node index.js`
 Graphql Server Running on localhost:4000
언제든지
Ctrl-C를 눌러서 서버를 중단할 수 있다. - 다음과 같은 메세지와
Generate models for GraphQL
-
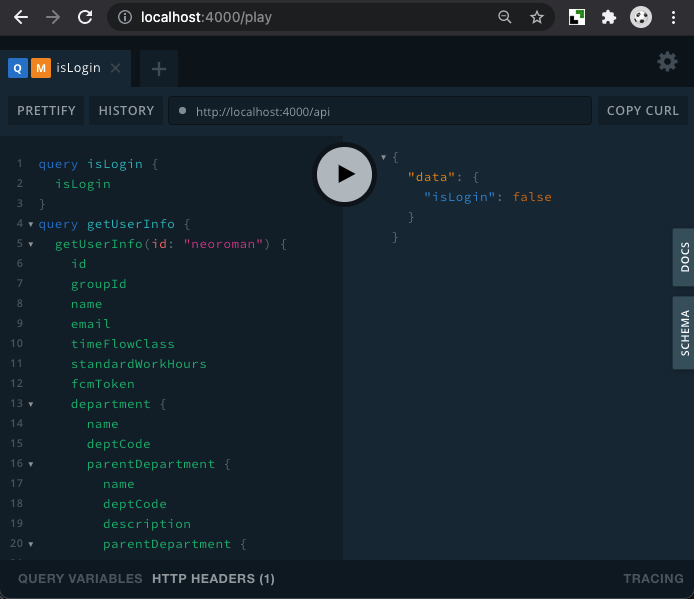
다음 주소를 즐겨사용하는 웹 브라우져 주소창에 넣고 이동한다. http://localhost:4000/play (구글 크롬 추천)
- 다음과 같이 쿼리를 입력해본다.
query {
   getUserInfo(id: "neoroman") {
     id
     name
   }
}
- 플레이 버튼을 누르면 다음과 같은 오류가 발생한다.
...
Error: Cannot return null for non-nullable field Query.getUserInfo.
...
이 오류는 GraphQL 리졸버(resolver)와 MySQL와 연결해주는 모델(model)이 부재하여 발생한 것이다.
sequelize-auto설치 (설치하지 않았다면)$ brew sequelize-auto- MySQL 데이터베이스
root패스워드 =qwer1234로sequelize-auto를 실행하여GraphQL Schema를 생성- 경고: 패스워드를 커맨드 입력란에 기입하는 것은 보안에 위험할 수 있음
$ sequelize-auto -c config/sequelize-auto.config.json -x qwer1234이제
{TABLE_NAME}.js파일들을./models내에서 확인할 수 있다.
- 경고: 패스워드를 커맨드 입력란에 기입하는 것은 보안에 위험할 수 있음
graphql/resolvers.js파일을 연다. - 다음의 코드와 다른 부분을 수정한다.const resolvers = { Query: { getUserInfo: async (parent, args, context, info) => { try { // 1 let userId = { id: args.id } const items = await AdminUser.findAll({ where: userId }); return items; } catch(err) {console.log(err);} } }, Mutation: { putUserInfo: async (parent, args, context, info) => { try { // 2 const user = await AdminUser.findOne({ where: { id: args.id } }); if (user) { if (args.password) { user.set('password', args.password); user.set('updateTime', (new Date())); } if (args.email) { user.set('email', args.email); } return await user.save(); } return new Error("putUserInfo: cannot find user:", args.id); } catch(err) { console.log(err) return new Error("putUserInfo", err); }; } } }- 1번은 args.id를 이용해서
AdminUser테이블을 조회한 결과를 리턴한다. - 2번은 args.id등 입력 인자들을 이용해서
AdminUser테이블의 사용자 정보를 수정한다.
- 1번은 args.id를 이용해서
play버튼을 다시 눌러보면, 이제 성공 결과를 확인할 수 있다. 짜잔
GraphQL 끝 (github)
- Sample of GraphQL-Yoga + Express + JWT
서버 설치
- MySQL 서버 설치
mysql홈브루( HomeBrew )를 통한MySQL설치$ brew install mysqlMySQL데몬 서비스 등록하기 (선택)$ brew services start mysqlMySQL데이터베이스root사용자 암호 설정하기$ mysql -uroot mysql> USE mysql mysql> ALTER USER 'root'@'localhost' IDENTIFIED BY 'qwer1234'; mysql> FLUSH PRIVILEGES; mysql> quitsample_db_graphql데이터 베이스 생성하기$ mysql -uroot -p mysql> CREATE DATABASE sample_db_graphql; mysql> quit
seeders/dump-sample_db_graphql.sql파일로부터 DB 복원하기$ mysql -uroot -p sample_db_graphql < ./seeders/dump-sample_db_graphql.sql- npm 의존성 패키지 설치하기
$ npm install3.1 If
sh: nodemon: command not founderror occurred$ npm i -g nodemon
서버 실행
- npm 으로 서버 시작하기
$ npm start- 다음과 같은 메세지와
localhost의 4000번 포트에 서버가 시작된다.
 [nodemon] 2.0.7
 [nodemon] to restart at any time, enter `rs`
 [nodemon] watching path(s): *.*
 [nodemon] watching extensions: js,mjs,json
 [nodemon] starting `babel-node index.js`
 Graphql Server Running on localhost:4000
언제든지
Ctrl-C를 눌러서 서버를 중단할 수 있다. - 다음과 같은 메세지와
-
Violla, now you can connect localhost:4000/play on your web brower, see next section
- (TODO) 심화학습 추가하기
GraphQL playground
- Open your favorite web browser (recommend Goolge Chrome)
- Paste and go to http://localhost:4000/play
- You could check like followings:

- Copy and paste graphql/playgroundQuery.txt queries into left pane of GraphQL playground
Authentication (Optional)
- Client call /secure with ID and Password
- /secure response is JWT(JSON Web Token)
- Client set header of request with token:
{given token} - Check token validation with /secure/check
- Client receive error unless JWT header for request
Further Study
- GraphQL Tools 활용 방법 Study
- 파일 업로드 지원
- GraphQL 구독을 사용한 실시간 기능
- TypeScript 지원
- 쿼리 성능 추적
References
- GraphQL: Guides and Best Practices
- GraphQL-yoga 소개 및 간단한 활용
- GraphQL - Node Tutorial - 02. Getting Started
- Redhat: GraphQL이란?